How to Install a Complete LAMP Stack on WSL 2: Ultimate Web Development Setup Guide
Learn how to set up a professional LAMP stack (Linux, Apache, MySQL, PHP) on Windows Subsystem for Linux 2. This comprehensive guide covers installation, configuration, virtual hosts, and database management for web development.


Setting up a local development environment is crucial for web developers, and Windows Subsystem for Linux 2 (WSL 2) has revolutionized the process for Windows users.
By combining the power of Linux with the convenience of Windows, WSL 2 provides an ideal platform for running a complete web server stack without the overhead of traditional virtual machines.
This guide will walk you through installing and configuring a full LAMP stack (Linux, Apache, MySQL, PHP) on WSL 2, allowing you to create a professional-grade development environment right on your Windows machine.
Prerequisites
Before beginning this installation, ensure you have the Linux subsystem already activated on your Windows 10 system. If you haven't completed this step yet, follow our guide on enabling the Linux subsystem on Windows 10.
For this tutorial, we'll be using Ubuntu 20.04 LTS as our Linux distribution.
Updating Your Linux Distribution
Start by updating your Ubuntu installation to ensure you have the latest packages and security updates:
sudo apt updateAfter updating the package lists, upgrade all installed packages to their latest versions:
sudo apt upgradeThis upgrade process may take several minutes depending on your internet connection speed and how many packages need updating.
Installing the LAMP Stack Components
Next, we'll install the core components of our LAMP stack: Apache web server, MySQL database server, and PHP with the Apache module:
sudo apt-get install apache2 php7.4 libapache2-mod-php7.4 mysql-server php7.4-mysqlAdditionally, install common PHP extensions that most web applications require:
sudo apt-get install php-curl php-gd php-intl php-json php-mbstring php-xmlManaging Apache and MySQL Services
After installation, let's properly configure the services to manage them efficiently in WSL 2:
First, stop both services if they're running:
sudo service apache2 stop
sudo service mysql stop
Then disable automatic startup to maintain control over when these services run:
sudo systemctl disable apache2
sudo systemctl disable mysql
This configuration allows you to manually start the services only when needed, saving system resources.
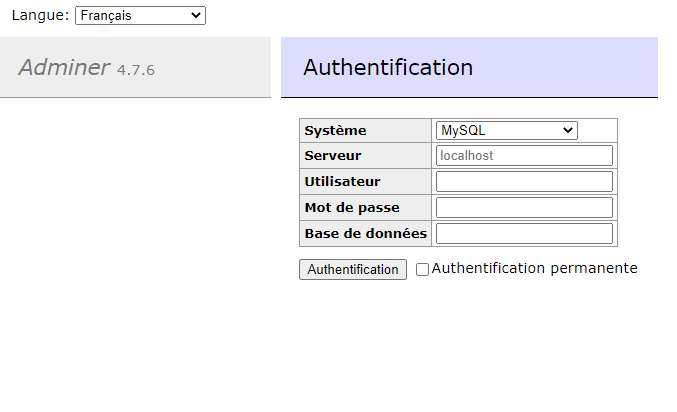
Installing a Database Management Interface
Managing databases through a graphical interface can simplify your workflow. If you don't already use tools like TablePlus or HeidiSQL, Adminer is an excellent lightweight option:
sudo apt-get install adminerConfigure Adminer to be accessible through Apache:
echo "Alias /adminer.php /usr/share/adminer/adminer.php" | sudo tee /etc/apache2/conf-available/adminer.confEnable the configuration and restart Apache:
sudo a2enconf adminer.conf
sudo service apache2 restart
Now you can access the database management interface at localhost/adminer.php.
Configuring MySQL User Access
Since Ubuntu 18.04, the root MySQL user requires sudo privileges for connection. Let's create a dedicated user for development purposes:
Start the MySQL service:
sudo service mysql startsudo usermod -d /var/lib/mysql/ mysql. If issues persist, try shutting down WSL with wsl.exe --shutdown in the terminal, then restart WSL and try again. Sometimes stopping Apache before starting MySQL can also resolve conflicts.Access the MySQL command line interface:
sudo mysqlCreate a new user with full privileges:
CREATE USER 'user'@'localhost' IDENTIFIED BY 'password';
GRANT ALL PRIVILEGES ON * . * TO 'user'@'localhost';
FLUSH PRIVILEGES;
Here ALL PRIVILEGES means that we want to give this user the rights to:
- CREATE
- DROP
- DELETE
- INSERT
- SELECT
- UPDATE
- GRANT OPTION
It is also possible to give only certain privileges to this user.
GRANT right_name ON db_name.table_name TO 'user'@'localhost';Then to remove rights, simply change the GRANT keyword to REVOKE.
REVOKE right_name ON db_name.table_name TO 'user'@'localhost';Remember to replace 'user' and 'password' with your preferred credentials. You can exit the MySQL interface by typing quit.
Optimizing PHP Configuration
Customize PHP settings to create a developer-friendly environment:
sudo nano /etc/php/7.4/apache2/php.iniUpdate the following settings for better error reporting during development:
- Change
display_errors = Offtodisplay_errors = On - Change
display_startup_errors = Offtodisplay_startup_errors = On - Set
error_reporting = E_ALL
Save the file by pressing Ctrl+X, then Y, followed by Enter.
Creating Project Directories with Symbolic Links
One of the biggest advantages of WSL 2 is the ability to create symbolic links between your Windows file system and the Linux subsystem:
sudo ln -s /mnt/d/Sites/projet /var/www/projetThis command creates a link between a Windows directory (D:\Sites\projet) and a location in your Linux file system (/var/www/projet).
Verify the link was created successfully:
cd /var/www && ls -lConfiguring Apache for Your Project
Let's take a look at what an Apache configuration file looks like. These are located in the /etc/apache2/sites-available folder.
Currently, in this folder we find two files :
000-default.confdefault-ssl.conf
If we display the contents of the 000-default.conf file with the command :
cat /etc/apache2/sites-available/000-default.confWe will end up with something like this :
<VirtualHost *:80>
  ServerAdmin webmaster@localhost
  DocumentRoot /var/www/html

  ErrorLog ${APACHE_LOG_DIR}/error.log
  CustomLog ${APACHE_LOG_DIR}/access.log combined
</VirtualHost>
The most important lines are:
<VirtualHost *:80>: Here, we will accept any IP on port 80. For now, the only IP configured islocalhost.DocumentRoot /var/www/html: This line is the entry point for the site.ErrorLog ${APACHE_LOG_DIR}/error.log: This line will allow you to specify the log file containing the list of errors that occurred during the hosting of the site.
Now that we have our symbolic link that link the folder /var/www/projet with /mnt/d/Sites/projet, we can use it in our Apache configuration file.
sudo nano /etc/apache2/sites-available/000-default.confChange the DocumentRoot line to:
DocumentRoot /var/www/projetReload Apache to apply changes:
sudo service apache2 reloadIf we go to localhost we should see this page appear.
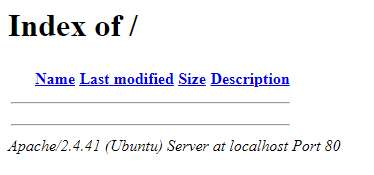
This is quite normal because, at the moment, we have no file in the D:\Sites\project directory.
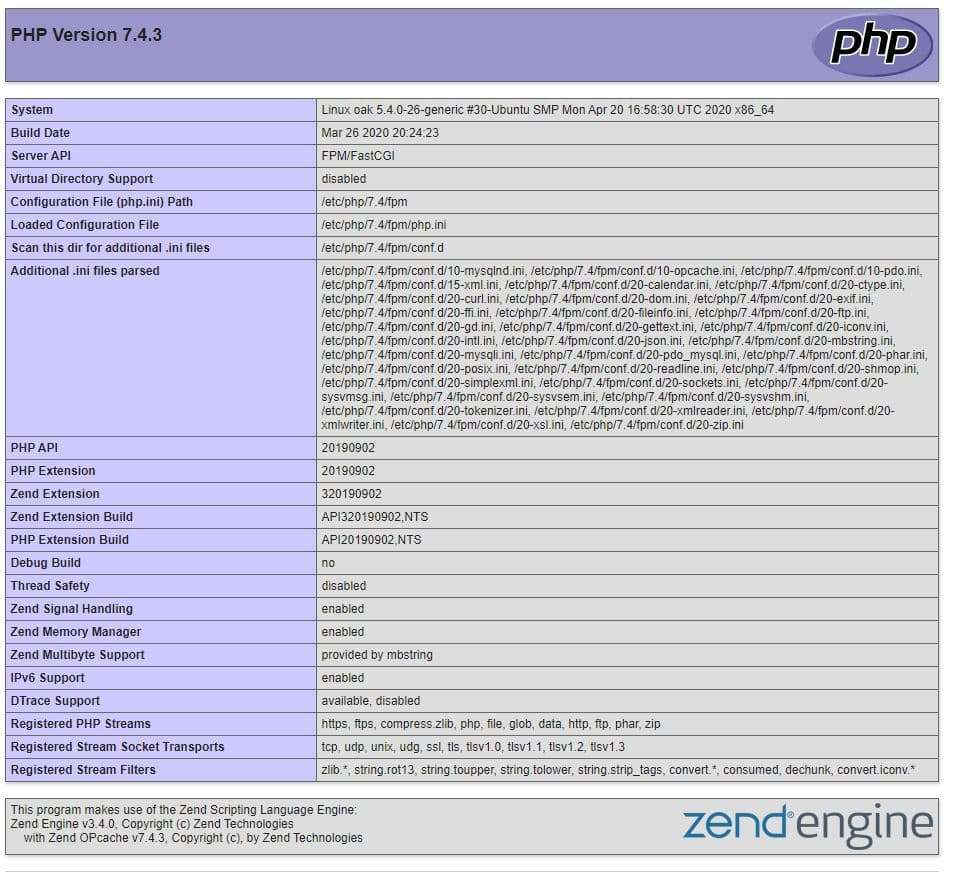
If we create a index.php file in the D:\Sites\project directory, and then put the following content :
<?php phpinfo(); ?>Save this as index.php in your D:\Sites\projet directory and access it through http://localhost in your browser.
Setting Up Custom Domain Names
Creating custom local domains improves your development workflow by allowing multiple projects to run simultaneously:
Create a new project directory and symbolic link:
sudo ln -s /mnt/d/Sites/blog /var/www/blogCreate a new Apache configuration file:
sudo touch /etc/apache2/sites-available/blog.confAdd the following configuration:
<VirtualHost *:80>
  ServerName www.blog.local
  ServerAlias blog.local
  ServerAdmin webmaster@localhost
  DocumentRoot /var/www/blog

  <Directory /var/www/>
    Options Indexes FollowSymLinks MultiViews
    AllowOverride all
    Order allow,deny
    Allow from all
  </Directory>

  ErrorLog /var/log/apache2/error.blog.local.log
  CustomLog /var/log/apache2/error.blog.local.log combined
</VirtualHost>
Enable the site and restart Apache:
sudo a2ensite blog.conf
sudo service apache2 restart
Configure your Windows hosts file to recognize the custom domain by adding these lines to C:\Windows\System32\drivers\etc\hosts:
::1               www.blog.local
127.0.0.1         www.blog.local
::1               blog.local
127.0.0.1 blog.localEnabling URL Rewriting for Modern Frameworks
If you plan to use modern PHP frameworks like Symfony or Laravel, enable the Apache rewrite module:
sudo a2enmod rewrite
sudo service apache2 restart
This enables URL rewriting through .htaccess files, which is essential for these frameworks' routing systems.
Managing and Removing Sites
To remove a site when no longer needed:
sudo rm /etc/apache2/sites-available/project_name.conf
sudo rm /etc/apache2/sites-enabled/project_name.conf
sudo rm /var/www/project_name
sudo rm /var/log/apache2/project_name.log
sudo service apache2 restart
Troubleshooting Common Issues
If you encounter the Apache error "Protocol not available: AH00076: Failed to enable APR_TCP_DEFER_ACCEPT", add these lines to /etc/apache2/apache2.conf:
AcceptFilter http none
AcceptFilter https none
Then restart Apache to resolve this error.
Conclusion
With WSL 2 and a properly configured LAMP stack, you now have a powerful, flexible development environment that combines the best of both Windows and Linux worlds.
This setup gives you the stability and compatibility of native Linux web stack components while maintaining the convenience of developing in Windows. You can now efficiently build, test, and debug web applications using industry-standard tools without the overhead of traditional virtual machines or dual-boot configurations.
As your projects grow, you can easily extend this environment by adding more virtual hosts, installing additional PHP extensions, or integrating with other development tools in your Windows ecosystem.


