How to Create Smooth CSS Transitions in Vue 3 Using the Transition Component
Learn how to use Vue 3’s built-in transition component to create smooth, customizable animations without external libraries. Step-by-step examples with CSS and real Vue code included.


Vue 3 makes it incredibly simple to bring your UI to life with transitions and animations—without relying on external libraries. Thanks to the built-in <transition> component, you can create polished effects that enhance user experience while keeping your codebase lightweight.
In this tutorial, you’ll learn how to implement smooth animations using Vue 3’s native transition system, including how to conditionally render elements and style transition states with CSS.
Why Use the <transition> Component?
Vue’s <transition> component lets you animate elements when they enter or leave the DOM. This eliminates the need for third-party animation libraries like GSAP or Animate.css for basic transitions.
You can easily define transitions using CSS. Vue takes care of applying the appropriate classes based on the animation’s state—such as entering, leaving, or being active—so you can focus on the design itself.
To use it, wrap the element you want to animate inside a <transition> tag and provide a name attribute. Vue will apply matching CSS classes during different phases of the animation.
<div> if needed.Basic Structure of a Vue Transition
Here’s how you might structure a simple Vue component that uses transitions:
<template>
  <section>
    <button @click="toggleDiv">
      {{ showDiv ? 'Hide' : 'Show' }}
    </button>
    <transition name="fade">
      <div id="container" v-show="showDiv">
        Modi ipsam facere repellendus et rerum laudantium repellendus sint.
        Ratione iusto saepe pariatur amet reprehenderit atque. Sit excepturi
      </div>
    </transition>
  </section>
</template>
In your <script> block, set up the reactive state and the toggle logic:
import { defineComponent } from 'vue';

export default defineComponent({
  data() {
    return {
      showDiv: false,
    };
  },
  methods: {
    toggleDiv() {
      this.showDiv = !this.showDiv;
    },
  },
});
When showDiv is true, the div appears with a transition. When it’s false, it disappears with a reverse animation.
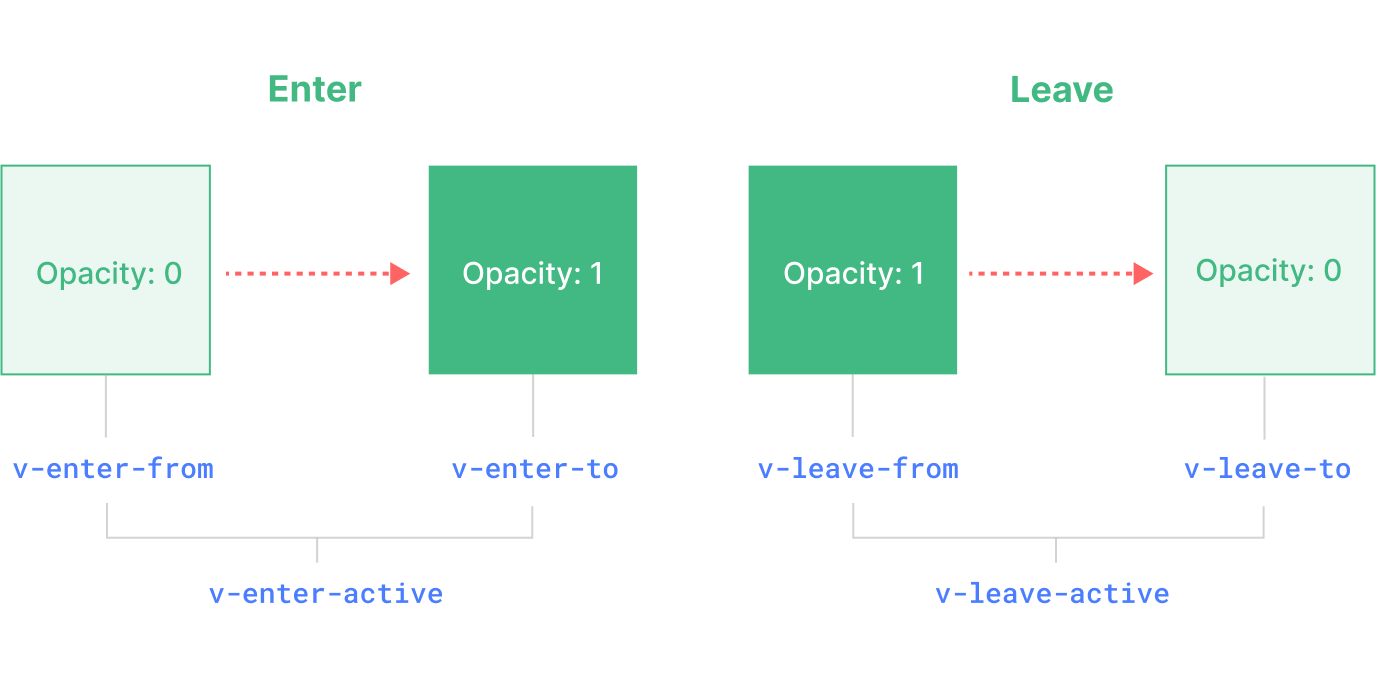
Understanding Vue 3 Transition Class Names
When the name prop is set to "fade", Vue automatically generates the following classes:
fade-enter-fromfade-enter-tofade-enter-activefade-leave-fromfade-leave-tofade-leave-active
You can define these classes in your <style> block using SCSS or regular CSS. The key is to pair the correct styles with the transition state.
Example CSS for Smooth Fade and Slide Animation
Here’s how to define your styles using SCSS:
.fade-enter-from,
.fade-leave-to {
  opacity: 0;
  transform: translateY(-20px);
}

.fade-enter-to,
.fade-leave-from {
  opacity: 1;
  transform: translateY(0);
}

$transition-duration: 0.5s;

.fade-enter-active,
.fade-leave-active {
  transition: opacity $transition-duration ease-in-out,
              transform $transition-duration ease-in-out;
}
If you’re using regular CSS instead of SCSS, replace the variable with the actual value:
.fade-enter-active,
.fade-leave-active {
  transition: opacity 0.5s ease-in-out, transform 0.5s ease-in-out;
}
This combination gives you a smooth fade-in and upward slide as the element appears, and a fade-out with a slide back up as it disappears.
How to Control Transitions Dynamically
Vue offers powerful ways to control transitions dynamically. You can:
- Use
v-showfor toggling visibility without removing the element from the DOM. - Use
v-ifto remove the element entirely from the DOM, triggering enter and leave transitions. - Bind transition durations with inline styles or custom variables for different speeds.
For more control, consider Vue’s <transition-group> when animating lists.
Explore the Full Example
A complete working example is available on GitHub: MrAnyx/vue-transition-example
This demo shows how to integrate everything covered above into a fully functional Vue 3 component.
Conclusion: Build Custom Animations with Vue’s Built-In Power
Vue 3’s transition component is a powerful native feature for creating clean, customizable animations without extra dependencies. By leveraging class-based states and conditional rendering, you can easily animate elements entering and leaving the DOM.
And since it’s all based on CSS, you’re free to design transitions that perfectly match your UI needs. Whether it’s a simple fade or a complex sequence, Vue’s built-in tools make it easy to bring your interface to life.


