How to Create and Manage Doctrine ORM Entities in Symfony 6
Learn how to create and manage entities using Doctrine ORM in Symfony 6. This step-by-step guide covers entity creation, migration, and data generation for your REST API.


By now, you should have a working Symfony project with the basic configuration so that you can perform the next steps. Among these steps, we find the entities definition.
As mentioned in the course statement, we will create an API that will allow us to manage a todo list.
Naturally, we'll need to create a Todo object so you can edit and manipulate them more easily.
Todo entity
Let's take a moment to define the different attributes that our Todo entity will need to have. Ideally, we will need to be able to:
- Enter a title
- Access the creation date
- Go to the last modification date
- Change the state of the Todo object when finishing a task.
Concretely, this means that we will have 4 different fields:
titleof the typestringcreatedAtof the typeDateTimeand more specificallyDateTimeImmutable. We will specify the typeimmutablefor the date because it adds precision. Moreover, once the Todo object is created, theDateTimeobject corresponding to the valuecreatedAtwill not be modified. Therefore, we can use the typeimmutableupdatedAtalso of the typeDateTimeImmutablecompletedof the typeboolean
Now that we know what our entity will look like the Todo entity, we can create it with the maker-bundle that we installed in the previous lesson.
To do this, run the following command:
php bin/console make:entity Todo
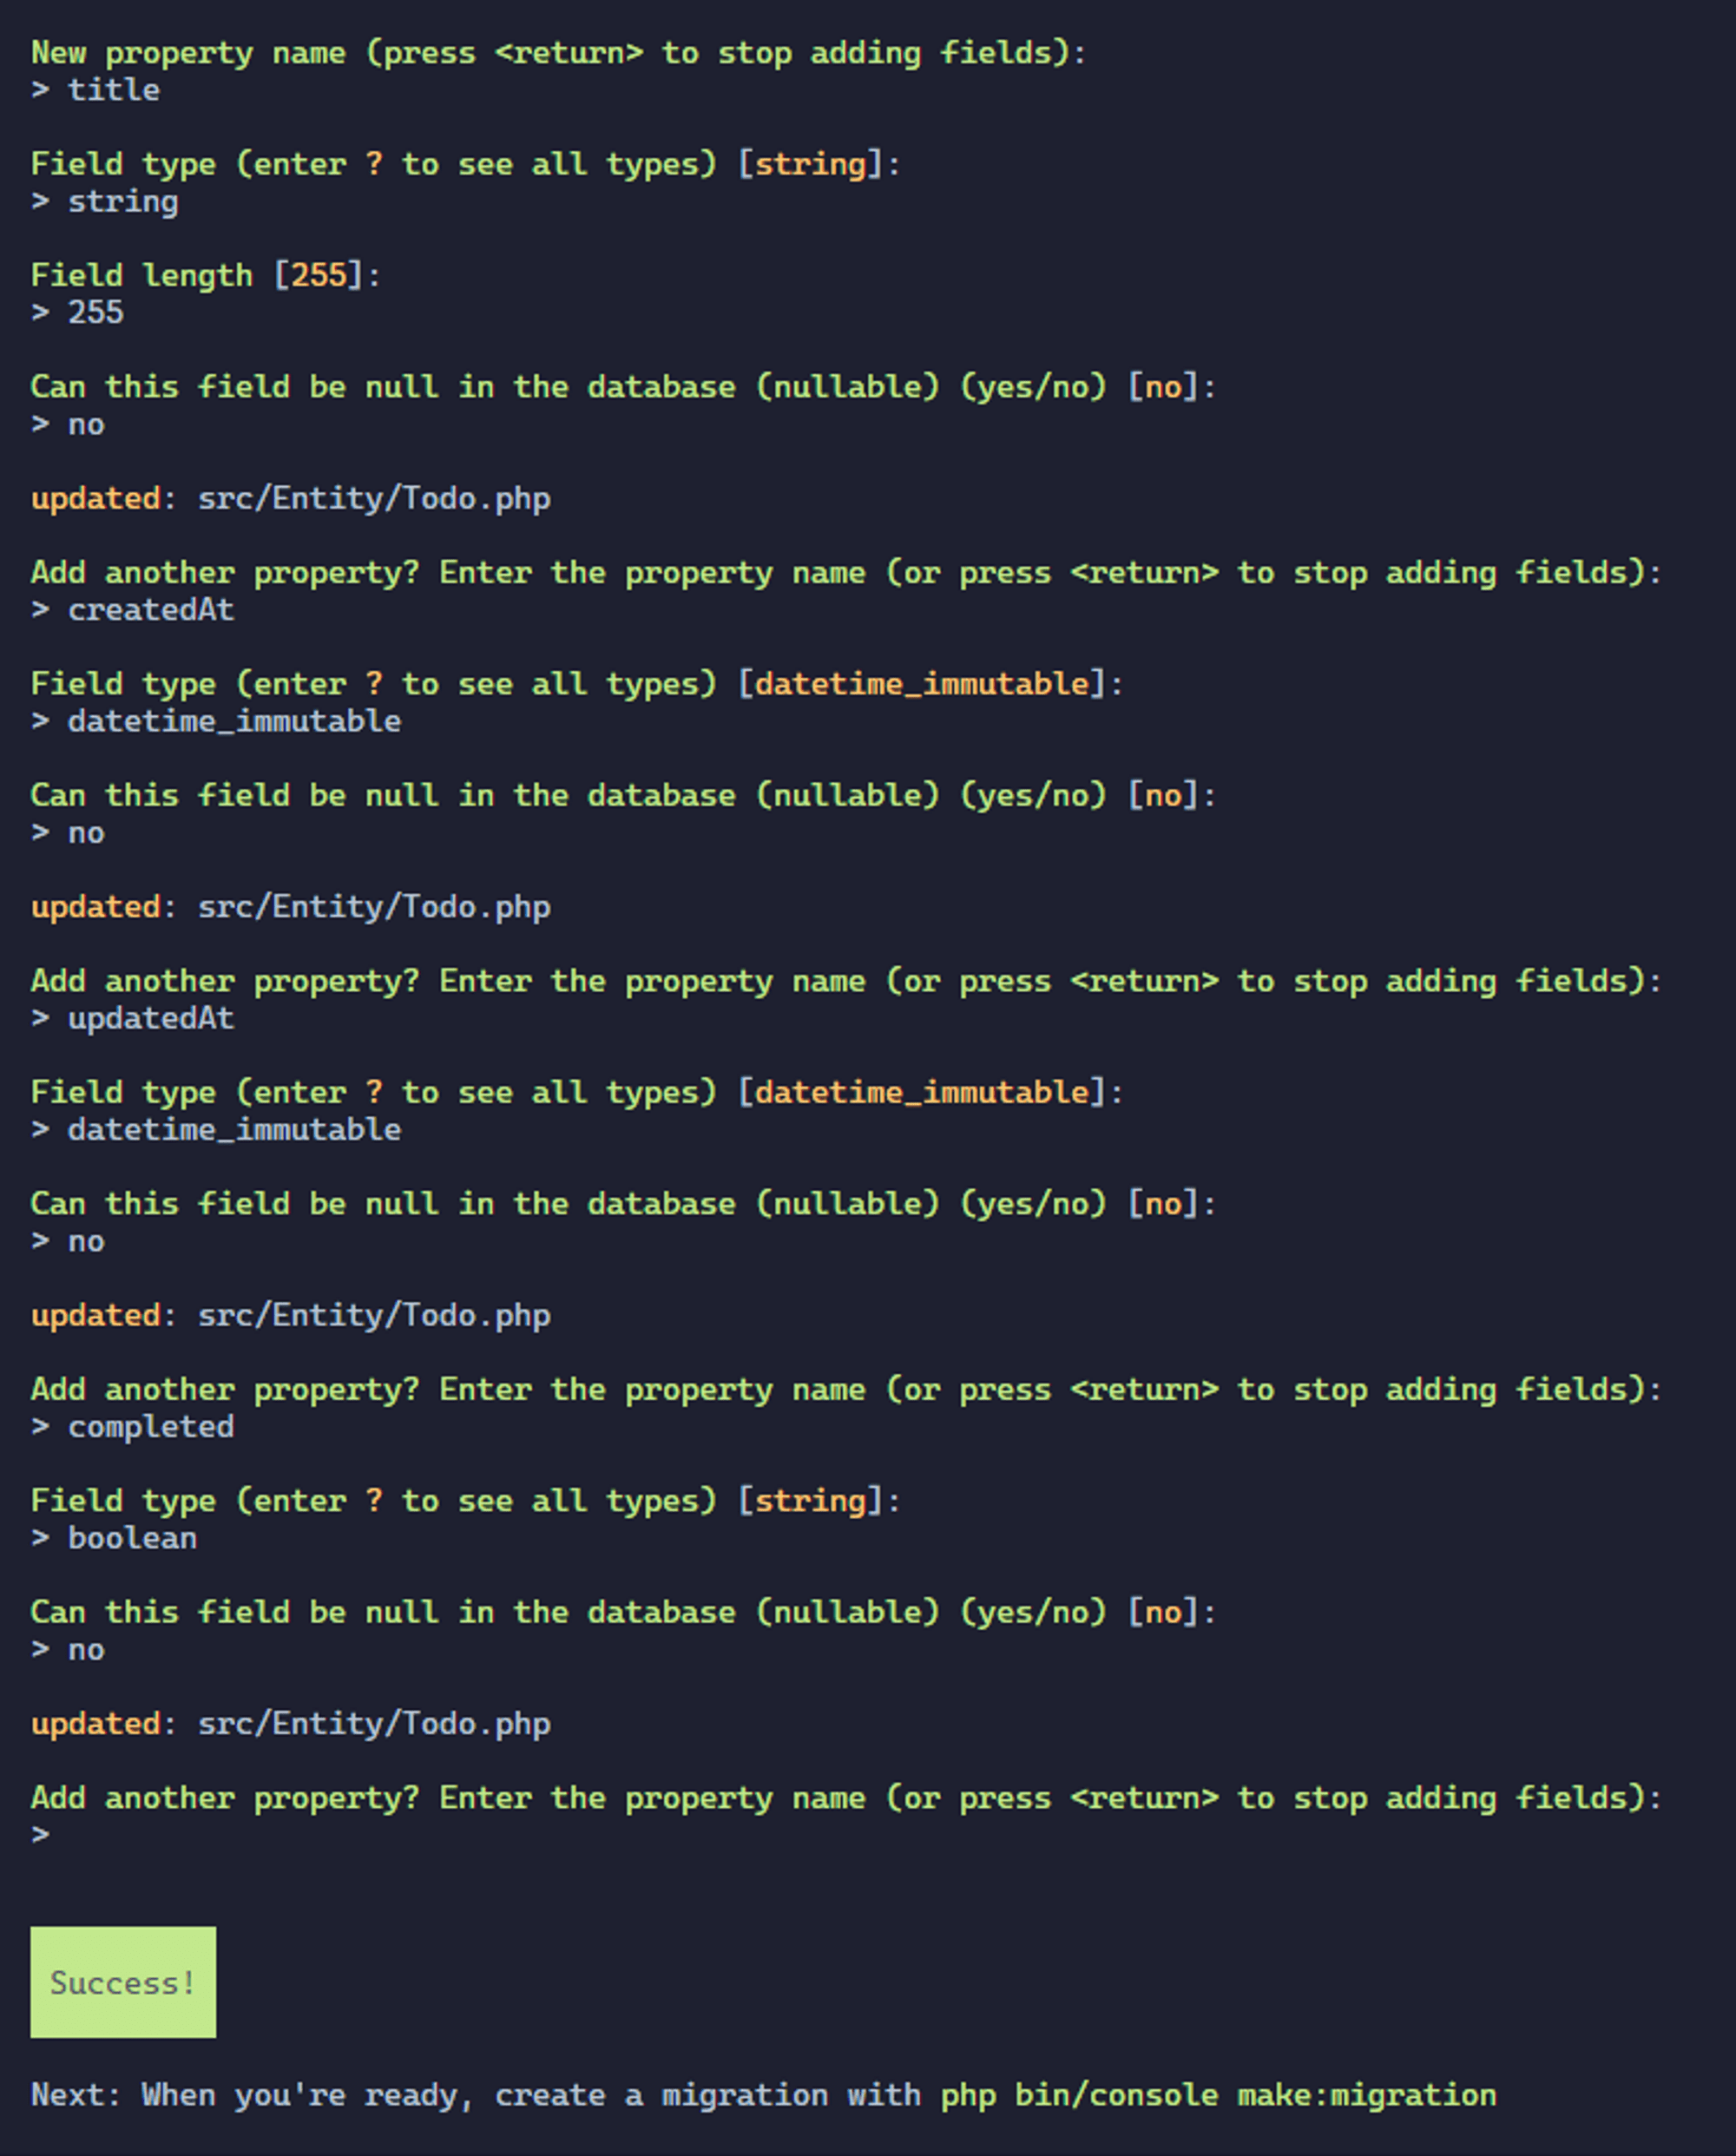
Then you will be asked several questions.
- First, the command will ask you to enter the name of the field you want to add.
- Then you will have to fill in the type of the latter. The list of possible types is available here.
- Depending on the type of field, you may have to enter the maximum size. For example, for fields of type
string, you will have to fill in the maximum length. - Finally, you must indicate whether the value can be
nullor not.
Thus, to create our Todo entity, you will have to fill in the fields with the following types.
This command allowed us to create our first Todo entity. We can also check that our entity has been created. Just check the attributes of the Todo class located in the src/Entity/Todo.php file. At this point, you should have the following content.
namespace App\Entity;

use App\Repository\TodoRepository;
use Doctrine\ORM\Mapping as ORM;

#[ORM\Entity(repositoryClass: TodoRepository::class)]
class Todo
{
  #[ORM\Id]
  #[ORM\GeneratedValue]
  #[ORM\Column]
  private ?int $id = null;

  #[ORM\Column(length: 255)]
  private ?string $title = null;

  #[ORM\Column]
  private ?\DateTimeImmutable $createdAt = null;

  #[ORM\Column]
  private ?\DateTimeImmutable $updatedAt = null;

  #[ORM\Column]
  private ?bool $completed = null;

  public function getId(): ?int
  {
    return $this->id;
  }

  public function getTitle(): ?string
  {
    return $this->title;
  }

  public function setTitle(string $title): self
  {
    $this->title = $title;

    return $this;
  }

  public function getCreatedAt(): ?\DateTimeImmutable
  {
    return $this->createdAt;
  }

  public function setCreatedAt(\DateTimeImmutable $createdAt): self
  {
    $this->createdAt = $createdAt;

    return $this;
  }

  public function getUpdatedAt(): ?\DateTimeImmutable
  {
    return $this->updatedAt;
  }

  public function setUpdatedAt(\DateTimeImmutable $updatedAt): self
  {
    $this->updatedAt = $updatedAt;

    return $this;
  }

  public function isCompleted(): ?bool
  {
    return $this->completed;
  }

  public function setCompleted(bool $completed): self
  {
    $this->completed = $completed;

    return $this;
  }
}
src/Entity/Todo.php
Migration file
Unfortunately, the previous command does not allow you to create tables in a database.
Indeed, as we can see, for the moment, there is no table. To correct this problem, we will have to generate the migration file.
With Symfony, nothing could be easier. Just run the following command.
php bin/console make:migration
This command will create a new file in the migrations folder containing the SQL queries to execute in order to create our Todo table in the database.
This is what we can see in the up method of this new file.
public function up(Schema $schema): void
{
  // this up() migration is auto-generated, please modify it to your needs
  $this->addSql('CREATE TABLE todo (id INT AUTO_INCREMENT NOT NULL, title VARCHAR(255) NOT NULL, created_at DATETIME NOT NULL COMMENT \'(DC2Type:datetime_immutable)\', updated_at DATETIME NOT NULL COMMENT \'(DC2Type:datetime_immutable)\', completed TINYINT(1) NOT NULL, PRIMARY KEY(id)) DEFAULT CHARACTER SET utf8mb4 COLLATE `utf8mb4_unicode_ci` ENGINE = InnoDB');
}
migrations/VersionYYYYMMDDHHIISS.php
After a brief check of the migration content, we will be able to execute our migration.
php bin/console doctrine:migrations:migrate
or
php bin/console d:m:m
This command will execute all the migrations that have not been executed.
After validating the command in the terminal, two new tables should have been created.
- The
doctrine_migration_versionstable simply allows Symfony to run migrations that have been created but not executed. It is important not to modify this table. - The
todotable corresponds to ourTodoentity that we created earlier. If we take a closer look at the fields that were created, we can see that there are 4 fields (title,created_at,updated_atandcompleted). In addition to these 4 fields, we find theidfield which serves as a primary key for our table and which allows us to distinguish each todo from the others.
Modification of the Todo entity
Although we have already executed the previous migration, we will need to make some changes to the Todo entity in order to make our lives easier later. Fortunately for us, the changes we will make do not require the creation of a new migration.
To be more precise, we will add a life cycle to our entity. Thanks to Doctrine, this step can be done very easily by adding a new annotation to the entity and a method involved.
The purpose of this operation will be to initialize and update automatically the values of the attributes createdAt and updatedAt. Otherwise, we would have to fill in these values each time by hand.
We will first add the HasLifecycleCallbacks annotation to our entity in the following way.
// ...
#[ORM\HasLifecycleCallbacks]
class Todo
{
  // ...
}
src/Entity/Todo.php
In a similar way, we will add new annotations to the methods setCreatedAt and setUpdatedAt.
For the setCreatedAt method, we will add the #[ORM\PrePersist] annotation as follows.
use DateTimeImmutable;

#[ORM\PrePersist]
public function setCreatedAt(): self
{
  $this->createdAt = new DateTimeImmutable('now');

  return $this;
}
src/Entity/Todo.php
Note that we no longer need the method parameters because when a new Todo object is created, the date will be the current date.
Concerning the setUpdatedAt method, we will add the #[ORM\PrePersist] and #[ORM\PreUpdate] annotations.
#[ORM\PrePersist]
#[ORM\PreUpdate]
public function setUpdatedAt(): self
{
  $this->updatedAt = new DateTimeImmutable('now');

  return $this;
}
src/Entity/Todo.php
The PrePersist annotation allows us to execute a particular method when our entity is persisted, in other words when it is created in the database for the first time.
As for the PreUpdate annotation, the method will be executed this time when our entity is modified.
Finally, we will change the default value of the completed field to false.
private ?bool $completed = false;
src/Entity/Todo.php
If we now try to regenerate a new migration with the command php bin/console make:migration, we notice that the message [WARNING] No database changes were detected is displayed, meaning that no changes were made.
Creation of a dataset
In order to properly test our api, we will have to create a fake data set. Rather than creating them by hand, we will use tools available with Symfony.
To do this we will use the orm-fixtures and zenstruck/foundry packages. To install them to the project, run the following command.
composer require --dev orm-fixtures zenstruck/foundry
This command will allow you to use the make:factory and make:fixtures commands.
Creation of a Factory
A Factory allows to define the way to create entities randomly in order to more easily generate fake data.
An example is worth a thousand words. Let's create our first Factory together. Run the following command.
php bin/console make:factory
You will be asked to choose the entity associated with the Factory you wish to create.
In our case, we will choose the entity App\Entity\Todo. This command creates the factories associated with the desired entities. A new file should have been created in the src/Factory folder.
We will still have to make some changes to this new file.
In the getDefaults method, we can remove the lines corresponding to the completed, createdAt and updatedAt attributes. Indeed, we can remove these two lines because the values will be automatically generated by the PrePersist and PreUpdate events or by the default value that we have defined.
You should have something like this.
protected function getDefaults(): array
{
  return [
    'title' => self::faker()->text(255),
  ];
}
src/Factory/TodoFactory.php
Creating a Fixture
Now that we have defined the way to generate fake data, we just have to generate them. To do so, we will use Symfony fixtures.
To create a fixture, just run the following command.
php bin/console make:fixtures TodoFixtures
This command should create a new file in the src/DataFixtures folder. It is in this file that we will create our data.
In the load method, just add the following content.
use App\Factory\TodoFactory;

public function load(ObjectManager $manager): void
{
  TodoFactory::createMany(5);
}
src/DataFixtures/TodoFixtures.php
5 by the number of data you want to create.All that remains is to execute our fixtures to really generate our data.
Generation of the data set
To generate our dataset, just run the following command.
php bin/console doctrine:fixtures:load
or
php bin/console d:f:l
If we view the data in our database, you should see 5 new rows in the todo table.

We now have a set of data to test our api and be able to develop more serenely.
In summary
In this lesson, we covered several key points, including
- Creating an entity
- Adding Doctrine events to entities
- Creating a
factory - Creating and launching
fixtures
The creation of the entity allows to represent the content of our database in the form of a PHP class in order to interact with it more easily.
The factory and fixtures allow us to generate data sets to test a project.
In the next lesson, we will see how to create our first controller to return JSON content.


