Implementing CRUD Operations in Symfony 6 for a RESTful Todo API
Learn how to implement Create, Read, Update, and Delete (CRUD) operations in Symfony 6 to build a fully functional REST API for managing Todo items.


In many cases, api will have a particular url structure and will rely on the structure of entities.
This structure will usually be broken down into 4 parts:
- C → Create : to create data
- R → Read : to read data
- U → Update : to update data
- D → Delete : to delete data
These 4 parts form the CRUD structure.
Moreover, the format of the urls will, very often, follow a particular logic.
Url format
As stated in the IBM REST API Convention, it will be much easier to maintain and evolve an api that is well constructed.
In this convention, it is stated that it will be better to create urls that do not contain a verb. For example, the routes /addTodo, /readTodo, or /updateTodo would not be correct. This is because these urls would create redundancy with the methods used (GET, POST, DELETE, ...). In addition, it is more complicated at a glance to know what entities are involved in the url.
On the other hand, routes like :
/todoswith thePOSTmethod/todos/:idwith theGETmethod/todos/:idwith thePATCHmethod
will be much easier to understand. This makes for a more uniform and easier to use API.
In summary, urls should be composed of the name of entities in plural and HTTP methods are used as verbs to know what we want to do (create, update, delete, ...).
This format can also be applied with relationships between entities. For example, if our Todo entity was linked to a Tag entity, we could have the following urls:
/todos/:id/tags/:idwith theGETmethod to read the information of the label with idid./todos/:id/tagswith theGETmethod to read the information of all the labels.- ...
Now that we have seen the url format to recommend but also the one we are going to use, we can go into the code and create our own CRUD url.
HTTP methods
Let's take a moment to detail the http methods in a REST API.
The convention that seems to be mostly used is the following.
GETto read dataPOSTto create dataDELETEto delete dataPUTmodify the whole dataPATCHto partially modify data
Reading all the todos
In fact, we already took care of this route in the previous part. Indeed, when we request the url /todos, we have the list of all the todos that have been created.
We will add a paging system later on, so as not to return too much data.
Reading a particular todo
This is probably the easiest one to implement. Indeed, we'll use Symfony's argument resolution system.
To do so, we just have to create a new route by filling the following parameters:
- path :
/todos/{id} - name :
get_todo - methods:
["GET"]
Now, in the arguments of the associated method, we will add the Todo $todo parameter which will be automatically injected by Symfony.
use App\Entity\Todo;

#[Route("/todos/{id}", "get_todo", methods: ["GET"])]
public function getTodo(Todo $todo): JsonResponse
{
  return $this->json($todo);
}
src/Controller/TodoController.php
So, if we query the url /api/todos/1, we should see the information corresponding to the todo with id 1.
{
  "id": 1,
  "title": "Sed ut perspiciatis unde omnis iste natus error sit voluptatem accusantium doloremque laudantium, totam rem aperiam",
  "createdAt": "2025-04-20T23:38:00+00:00",
  "updatedAt"; "2025-04-20T23:38:00+00:00",
  "completed": false
}404 error will be returned.Creating a todo
This time, we will have to integrate logic to create our todo. In the case of reading, we only had to retrieve the data, whereas for creating, we will have to write the logic to create our element.
Let's start by creating the associated route.
#[Route("/todos", "create_todo", methods: ["POST"])]
public function createTodo(): JsonResponse
{
}
src/Controller/TodoController.php
Here, the method used will be POST because it is a creation.
First, we will have to retrieve the content of the HTTP request which will contain the necessary parameters to create our todo element. This content is located in the $request->getContent() object. Unfortunately, the result returned by this method is in the form of a serialized JSON. In other words, we will have to deserialize it first before we can manipulate it. To do this, we can use the json_decode method which will return an associative array.
use Symfony\Component\HttpFoundation\Request;

#[Route("/todos", "create_todo", methods: ["POST"])]
public function createTodo(Request $request): JsonResponse
{
  $requestBody = json_decode($request->getContent(), true);
}
src/Controller/TodoController.php
If we try to debug the result with the dd method, we get the following result.

Perfect! All that's left to do is to create our todo thanks to the parameters that the user will be able to send us via the request.
To do this, we just have to create a new object Todo and then fill in the parameters.
#[Route("/todos", "create_todo", methods: ["POST"])]
public function createTodo(Request $request): JsonResponse
{
  $requestBody = json_decode($request->getContent(), true);
  $todo = new Todo();
  $todo->setTitle($requestBody["title"]);
}
src/Controller/TodoController.php
As for the Factory associated to the todo, it is not necessary to fill in the completed, createdAt and updatedAt fields because they will be automatically managed by the entity.
Finally, to save this object in database, we will use the repository corresponding to the todos with the save method. To use it, we will simply inject it in the parameters of our method.
#[Route("/todos", "create_todo", methods: ["POST"])]
public function createTodo(Request $request, TodoRepository $todoRepository): JsonResponse
{
  $requestBody = json_decode($request->getContent(), true);
  $todo = new Todo();
  $todo->setTitle($requestBody["title"]);

  $todoRepository->save($todo, true);
}
src/Controller/TodoController.php
Finally, we will return the created object in serialized version accompanied by the HTTP code 201 to indicate to the user that the object has been created.
use Symfony\Component\HttpFoundation\Response;

#[Route("/todos", "create_todo", methods: ["POST"])]
public function createTodo(Request $request, TodoRepository $todoRepository): JsonResponse
{
  // ...

  return $this->json($todo, status: Response::HTTP_CREATED);
}
src/Controller/TodoController.php
So, if we go to the /api/todos route with the POST method by filling in the title parameter in the request body, we should see our newly created element.
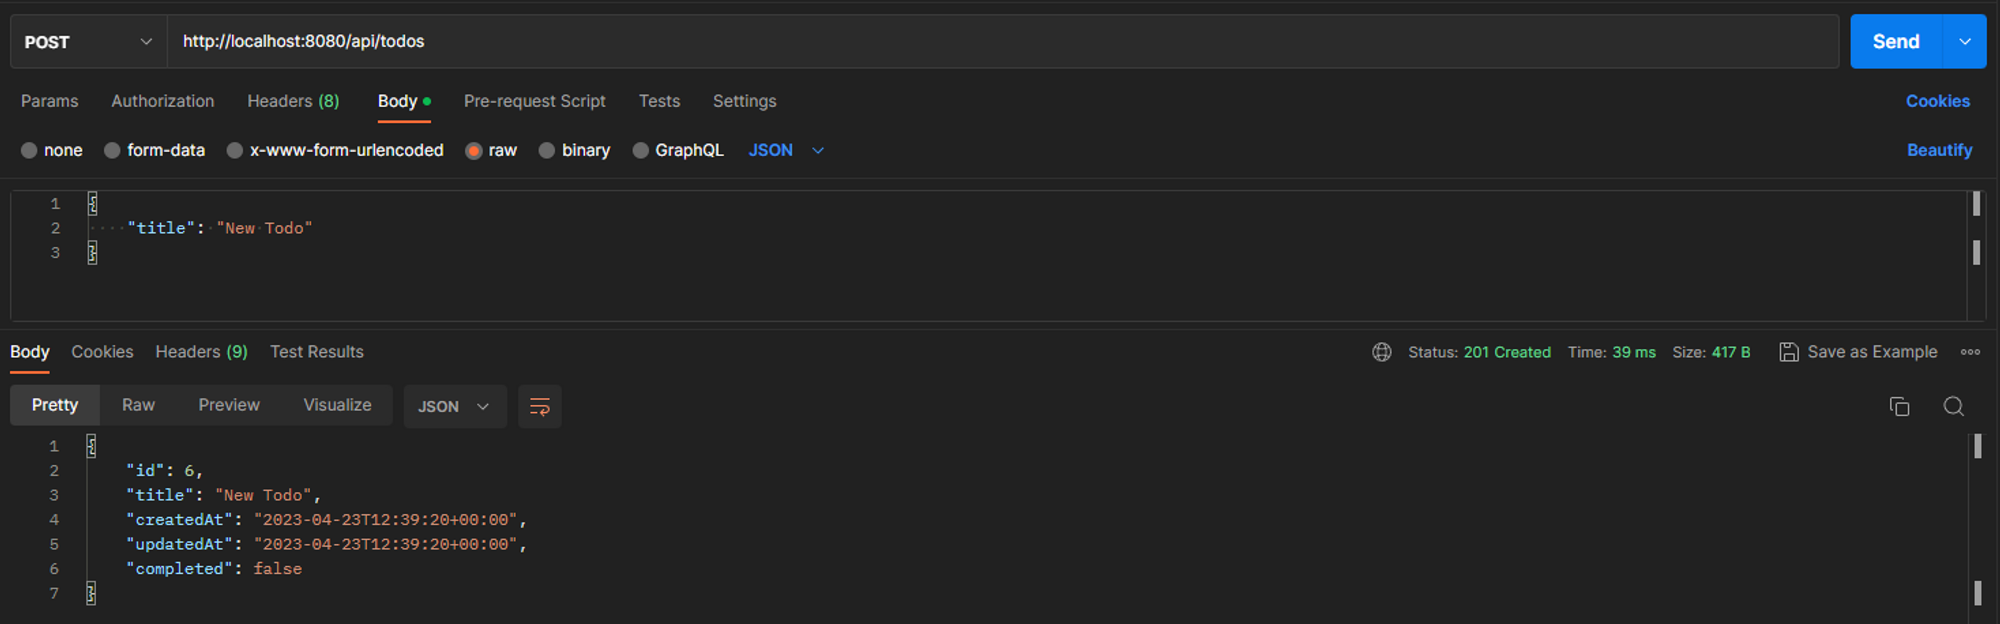
We can also notice that the HTTP code of the response matches the 201 code we defined earlier.
If we check in our database, we can also notice our new todo.
Unfortunately, although this method works, we will have to make some changes to our code. Indeed, this method does not check the user's data at all. It is possible that a malicious user tries to create data to compromise the system. So, we will have to check the relevance of the data that the user sends us.
Parameter validation
The validation of the user's parameters will go through two tools:
- The constraints that we will apply to the different fields of an entity
- An
OptionsResolverto validate the data of the request.
These two modules are not available natively in the minimal version of Symfony. To install them, just run the following command.
composer require validation symfony/options-resolver
We will first deal with the validation of data in the entity. There are many validation constraints available with Symfony. As indicated in the documentation, you can validate strings, numbers, booleans, passwords, ...
In our case, we will simply add some constraints on the title field of our Todo entity. We will use the constraints :
NotBlankto prevent the field from being emptyLengthto restrict the maximum size
Let's start by importing the constraint collection.
use Symfony\Component\Validator\Constraints as Assert;
src/Entity/Todo.php
Then, let's add the 2 constraints we just mentioned.
#[ORM\Column(length: 255)]
#[Assert\NotBlank]
#[Assert\Length(max: 255)]
private ?string $title = null;
src/Entity/Todo.php
That's it.
Now, in the controller, when creating a new todo, we will be able to validate these constraints.
To do this, we will modify the arguments of the method to add ValidatorInterface $validator and then we will add the following code.
use Symfony\Component\HttpKernel\Exception\BadRequestHttpException;
use Symfony\Component\Validator\Validator\ValidatorInterface;

#[Route("/todos", "create_todo", methods: ["POST"])]
public function createTodo(Request $request, TodoRepository $todoRepository, ValidatorInterface $validator): JsonResponse
{
  $requestBody = json_decode($request->getContent(), true);
  $todo = new Todo();
  $todo->setTitle($requestBody["title"]);

  // To validate the entity
  $errors = $validator->validate($todo);
  if (count($errors) > 0) {
    throw new BadRequestHttpException((string) $errors);
  }

  $todoRepository->save($todo, true);

  return $this->json($todo, status: Response::HTTP_CREATED);
}
src/Controller/TodoController.php
If we try this route again, everything should work as before except that now, if we try to create a todo with a title containing more than 255 characters or an empty title, an error will be returned.
With this method, we check the validity of the fields filled in. However, we do not check their presence in the body of the request. To do this, we will use the second library we have installed: OptionsResolver.
As indicated in the documentation, an OptionsResolver allows to manipulate and manage lists more easily in PHP. This tool allows you to make fields mandatory or optional, set default values, normalize values, ...
In our case, we are going to use them to make the parameters of the creation request body mandatory.
To do this, we will first create our OptionsResolver in a new folder that we will create: /src/OptionsResolver. Then let's create the file TodoOptionsResolver.php in which we will put the following content that we will detail in a moment.
namespace App\OptionsResolver;

use Symfony\Component\OptionsResolver\OptionsResolver;

class TodoOptionsResolver extends OptionsResolver
{
  public function configureTitle(bool $isRequired = true): self
  {
    $this->setDefined("title")->setAllowedTypes("title", "string");

    if($isRequired) {
      $this->setRequired("title");
    }

    return $this;
  }

  public function configureCompleted(bool $isRequired = true): self
  {
    $this->setDefined("completed")->setAllowedTypes("completed", "bool");

    if($isRequired) {
      $this->setRequired("completed");
    }

    return $this;
  }
}
src/OptionsResolver/TodoOptionsResolver.php
First, we notice that we make a distinction between the title and completed fields. This is because for a request to create a todo, only the title field is mandatory, while for an update request, both title and completed fields can be filled in.
This being done, we can now use it in our controller. As for the other services, we will first inject it via the method arguments.
use App\OptionsResolver\TodoOptionsResolver;

#[Route("/todos", "create_todo", methods: ["POST"])]
public function createTodo(Request $request, TodoRepository $todoRepository, ValidatorInterface $validator, TodoOptionsResolver $todoOptionsResolver): JsonResponse
{
  // ...
}
src/Controller/TodoController.php
Then we will use it in the following way.
#[Route("/todos", "create_todo", methods: ["POST"])]
public function createTodo(Request $request, TodoRepository $todoRepository, ValidatorInterface $validator, TodoOptionsResolver $todoOptionsResolver): JsonResponse
{
  $requestBody = json_decode($request->getContent(), true);
  $fields = $todoOptionsResolver->configureTitle(true)->resolve($requestBody);
  // ...
}
src/Controller/TodoController.php
Since the configureCompleted method is not used here, only the title field will be needed and mandatory.
Then we can create our todo element in the same way as before.
#[Route("/todos", "create_todo", methods: ["POST"])]
public function createTodo(Request $request, TodoRepository $todoRepository, ValidatorInterface $validator, TodoOptionsResolver $todoOptionsResolver): JsonResponse
{
  $requestBody = json_decode($request->getContent(), true);

  $fields = $todoOptionsResolver->configureTitle(true)->resolve($requestBody);
  $todo = new Todo();
  $todo->setTitle($fields["title"]);

  $errors = $validator->validate($todo);
  if (count($errors) > 0) {
    throw new BadRequestHttpException((string) $errors);
  }

  $todoRepository->save($todo, true);

  return $this->json($todo, status: Response::HTTP_CREATED);
}
src/Controller/TodoController.php
Let's try our api again with this new configuration. If we try to query the /api/todos route with the POST method and we don't fill in any parameters in the body of the query, an error should appear.
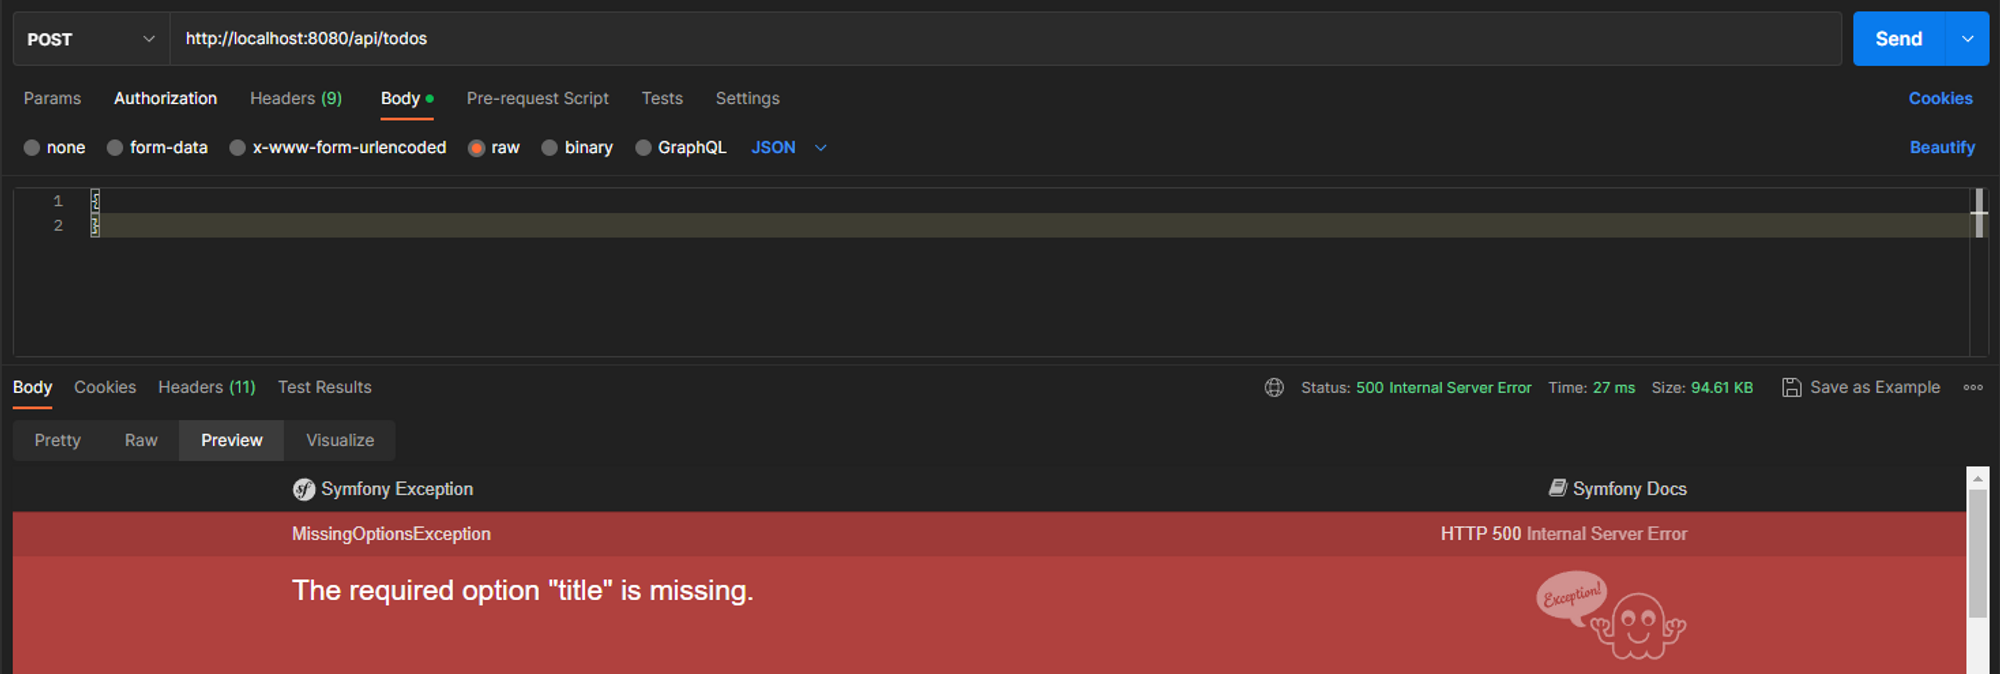
Although it works, we notice that the HTTP code that is returned is 500, which corresponds to a server error. Here, it is rather a 400 error, which means that the request is bad.
To fix this problem, we just need to add a try and a catch to our method.
use InvalidArgumentException;

#[Route("/todos", "create_todo", methods: ["POST"])]
public function createTodo(Request $request, TodoRepository $todoRepository, ValidatorInterface $validator, TodoOptionsResolver $todoOptionsResolver): JsonResponse
{
  try {
    $requestBody = json_decode($request->getContent(), true);

    $fields = $todoOptionsResolver->configureTitle(true)->resolve($requestBody);
    $todo = new Todo();
    $todo->setTitle($fields["title"]);

    $errors = $validator->validate($todo);
    if (count($errors) > 0) {
      throw new InvalidArgumentException((string) $errors);
    }

    $todoRepository->save($todo, true);

    return $this->json($todo, status: Response::HTTP_CREATED);
  } catch(Exception $e) {
    throw new BadRequestHttpException($e->getMessage());
  }
}
src/Controller/TodoController.php
I also changed the exception that is returned in the if that checks for constraints from BadRequestHttpException to InvalidArgumentException. Thus, the catch will take care of returning a 400 error.
If we retry the same request as before, we get the following result.

This time, the error code is 400 which is much more logical.
Deleting a todo
To delete a todo, the logic is much simpler. As for reading a todo, we will use the url /todos/{id}. This way, we can inject the corresponding todo via the method arguments. This time we will use the HTTP method DELETE because it is a deletion.
#[Route("/todos/{id}", "delete_todo", methods: ["DELETE"])]
public function deleteTodo(Todo $todo)
{
  // ...
}
src/Controller/TodoController.php
Next, we'll simply use the remove method from the todos repository. To do this, we'll inject it into the parameters and then use it, just like creation.
#[Route("/todos/{id}", "delete_todo", methods: ["DELETE"])]
public function deleteTodo(Todo $todo, TodoRepository $todoRepository)
{
  $todoRepository->remove($todo, true);
}
src/Controller/TodoController.php
Finally, all that remains is to return a response to the user. In the case of a deletion, the content will usually be empty. Therefore, we can return the value null along with the HTTP code 204 which indicates that the response contains no content.
#[Route("/todos/{id}", "delete_todo", methods: ["DELETE"])]
public function deleteTodo(Todo $todo, TodoRepository $todoRepository)
{
  $todoRepository->remove($todo, true);

  return $this->json(null, Response::HTTP_NO_CONTENT);
}
src/Controller/TodoController.php
That's all we have to do for deletion.
Modifying a todo
On the other hand, for the modification, the logic will be a bit more complex. We will have to make the title and completed fields mandatory depending on the method used for the request (PATCH or PUT). Then we will have to conditionally update these same fields.
Let's start by creating the route.
#[Route("/todos/{id}", "update_todo", methods: ["PATCH", "PUT"])]
public function updateTodo(Todo $todo)
{
}
src/Controller/TodoController.php
To simplify things and avoid duplication, we will deal with both total and partial modifications, respectively associated with the PATCH and PUT methods.
Then, as with the creation of a todo, we will have to use constraints and the OptionsResolver to validate the data the user sends us.
use Doctrine\ORM\EntityManagerInterface;

#[Route("/todos/{id}", "update_todo", methods: ["PATCH", "PUT"])]
public function updateTodo(Todo $todo, Request $request, TodoOptionsResolver $todoOptionsResolver, ValidatorInterface $validator, EntityManagerInterface $em)
{
  try {
    $requestBody = json_decode($request->getContent(), true);

    $fields = $todoOptionsResolver
      ->configureTitle(...)
      ->configureCompleted(...)
      ->resolve($requestBody);

    // ...

  } catch(Exception $e) {
    throw new BadRequestHttpException($e->getMessage());
  }
}
src/Controller/TodoController.php
Unfortunately, as you can see, the parameter we have to fill in the configureTitle and configureCompleted methods will depend on the http method used. Indeed, if the method is PUT the value true will have to be filled in. On the other hand, if the method is PATCH, the value false should be filled in.
Fortunately, the Request object of Symfony allows to retrieve the HTTP method used with the getMethod() method.
$isPutMethod = $request->getMethod() === "PUT";
src/Controller/TodoController.php
Now we can use this variable to make the title and completed fields mandatory or not in the OptionsResolver.
#[Route("/todos/{id}", "update_todo", methods: ["PATCH", "PUT"])]
public function updateTodo(Todo $todo, Request $request, TodoOptionsResolver $todoOptionsResolver, ValidatorInterface $validator, EntityManagerInterface $em)
{
  try {
    $requestBody = json_decode($request->getContent(), true);
    $isPutMethod = $request->getMethod() === "PUT";

    $fields = $todoOptionsResolver
      ->configureTitle($isPutMethod)
      ->configureCompleted($isPutMethod)
      ->resolve($requestBody);

    // ...

  } catch(Exception $e) {
    throw new BadRequestHttpException($e->getMessage());
  }
}
src/Controller/TodoController.php
Now we'll have to take care of the conditional modification of the fields. To do this, we'll simply use a foreach loop that will loop over the fields in the query body.
foreach($fields as $field => $value) {
  switch($field) {
    case "title":
      $todo->setTitle($value);
      break;
    case "completed":
      $todo->setCompleted($value);
      break;
  }
}
src/Controller/TodoController.php
All that remains is to add the validation of the constraints and the saving in the database and you're done.
You should now have the following code.
#[Route("/todos/{id}", "update_todo", methods: ["PATCH", "PUT"])]
public function updateTodo(Todo $todo, Request $request, TodoOptionsResolver $todoOptionsResolver, ValidatorInterface $validator, EntityManagerInterface $em)
{
  try {
    $isPatchMethod = $request->getMethod() === "PUT";
    $requestBody = json_decode($request->getContent(), true);

    $fields = $todoOptionsResolver
      ->configureTitle($isPatchMethod)
      ->configureCompleted($isPatchMethod)
      ->resolve($requestBody);

    foreach($fields as $field => $value) {
      switch($field) {
        case "title":
          $todo->setTitle($value);
          break;
        case "completed":
          $todo->setCompleted($value);
          break;
      }
    }

    $errors = $validator->validate($todo);
    if (count($errors) > 0) {
      throw new InvalidArgumentException((string) $errors);
    }

    $em->flush();

    return $this->json($todo);
  } catch(Exception $e) {
    throw new BadRequestHttpException($e->getMessage());
  }
}
src/Controller/TodoController.php
If we test our new route with the PATCH method you should get the following result.

And for the PUT request:

PUT query it is necessary to fill in all the fields of a todo even if they are not modified. For the PATCH query, only the fields that have been modified can be filled in.Also, note that the
updatedAt field is automatically updated thanks to the events we added previously.In summary
In this (long) lesson, we covered many topics. We started with some details about how CRUD works and the HTTP methods that were associated.
Then we have detailed how each part works to read, create, update or delete data...
In the next lesson we will talk about error handling in the context of an API.


